In the realm of fermented foods, milk kefir stands as a probiotic powerhouse. With its tangy flavor and myriad of health benefits, milk kefir has gained popularity among health-conscious individuals. However, did you know that you can transform this wonderful elixir into a delicious cheese? In this blog post, we’ll delve into the fascinating world of making cheese with milk kefir. Get ready to unlock the secrets of this simple yet exquisite process that allows you to enjoy the creamy goodness of cheese while reaping the rewards of probiotics.
Understanding Milk Kefir

Before diving into the cheese-making process, let’s explore what milk kefir is and why it’s an exceptional base for cheese production. Milk kefir is a fermented dairy product made by inoculating milk with kefir grains, which are small gelatinous colonies of bacteria and yeast. During fermentation, these grains metabolize lactose, the natural sugar present in milk, converting it into lactic acid. This process not only gives milk kefir its distinctive tangy flavor but also enhances its nutritional profile, as the lactose content decreases significantly.
Tools and Ingredients
To begin your cheese-making journey, you’ll need a few essential tools and ingredients. Here’s a list of what you’ll require:
- Milk Kefir: Start with a batch of freshly fermented milk kefir. You can either make it at home using kefir grains or purchase it from a reputable source.
- Cheesecloth or Muslin Cloth: This will be used for straining and draining the whey from the cheese.
- Strainer: A fine-mesh strainer or colander is necessary for separating the curds from the whey.
- Flavorings (optional): Depending on your preference, you can experiment with various herbs, spices, or even dried fruits to add flavor to your cheese.
Cheese-Making Process
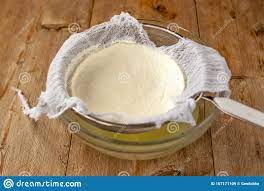
- Straining the Whey:
- Place a strainer or colander over a large bowl.
- Line the strainer with a cheesecloth or muslin cloth, ensuring that it is securely in place.
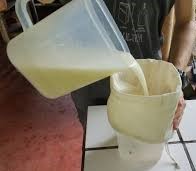
- Pour the milk kefir into the lined strainer and let it sit undisturbed for 12-24 hours. This allows the whey to drain, leaving behind the curds.
- Shaping the Cheese:
- Once most of the whey has drained, you can gather the edges of the cheesecloth and gently twist them to squeeze out any remaining liquid.
- Now, you have a choice: you can leave the cheese as is, creating a soft and spreadable cheese, or you can proceed to press it for a firmer texture.
- To press the cheese, place a weight on top of the wrapped curds. This can be a heavy can or a plate with something heavy on it. Leave it for 2-4 hours or overnight, depending on your desired texture.
- Adding Flavor (optional):
- If you wish to infuse your cheese with additional flavors, this is the time to do so. Mix in herbs, spices, or dried fruits into the cheese before shaping or pressing it. This step allows the flavors to meld and infuse the cheese.
- Aging the Cheese (optional):
- For a more complex flavor profile, you can age the cheese in the refrigerator for a few days. Wrap the cheese in wax paper or plastic wrap to prevent it from drying out.
- Enjoying Your Homemade Cheese: Once you’re satisfied with the texture and flavor of your cheese, it’s time to indulge. Spread it on crackers, sandwiches, or even enjoy it as a standalone snack. The creamy tanginess of the cheese, infused with the subtle flavors you added, will undoubtedly tantalize your taste buds.
Tips and Variations

- Experiment with different strains of kefir grains. Each strain can impart a unique flavor and texture to your cheese.
- Try using different types of milk, such as cow’s milk, goat’s milk, or even non-dairy alternatives like coconut milk or almond milk, to create diverse flavors and textures.
- Don’t discard the whey! It’s a nutritious byproduct that can be used in smoothies, baking, or fermenting vegetables.
- Get creative with flavor combinations. Add fresh herbs like thyme or rosemary, spices like paprika or garlic, or even dried fruits like cranberries or apricots to create your own signature cheese.
Benefits of Kefir Cheese
The beauty of making cheese with milk kefir extends beyond its delicious taste. It offers several health benefits:

- Probiotics: Milk kefir is rich in beneficial bacteria and yeasts, which can promote a healthy gut microbiome and support digestion.
- Nutrient Density: Kefir cheese retains the nutritional qualities of milk kefir, including vitamins, minerals, and essential amino acids.
- Digestibility: The fermentation process breaks down lactose, making kefir cheese easier to digest for lactose-intolerant individuals.
- Immune Support: Probiotics in kefir cheese have been linked to enhanced immune function and reduced inflammation.
In conclusion
Unlock the potential of milk kefir by venturing into the world of cheese-making. With a few simple steps, you can transform this probiotic elixir into a delectable cheese that not only satisfies your taste buds but also nurtures your overall well-being.
Embark on this culinary adventure and let the magic of milk kefir cheese delight you with every creamy bite. Enjoy the process of experimenting with flavors, textures, and aging to create your own artisanal creations. Start harnessing the power of milk kefir today and experience the joy of homemade probiotic cheese like never before.