
Introduction
Are you a fan of tangy, probiotic-rich foods? If so, you’re in for a treat! Kefir cheese, also known as kefir labneh, is a versatile and delectable dairy product that can easily be made at home. With its creamy texture, tangy flavor, and numerous health benefits, kefir cheese is a perfect addition to your culinary repertoire. In this blog post, we’ll guide you through the simple steps of making your very own kefir cheese, allowing you to explore the world of fermentation and indulge in a delicious, homemade treat.
What is Kefir Cheese?

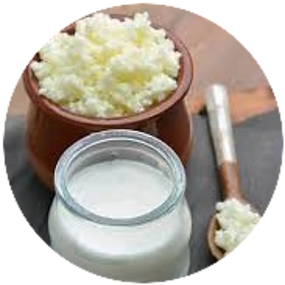
Kefir cheese is a type of soft cheese made from kefir, a fermented milk product. Kefir is created by adding kefir grains, which are a combination of bacteria and yeast, to milk. The fermentation process breaks down lactose, making kefir suitable for those with lactose intolerance. By straining kefir, you can separate the whey from the curds, resulting in a thick, creamy cheese that resembles Greek yogurt or cream cheese. The longer you strain it, the thicker and more tangy the cheese becomes. This versatile ingredient can be enjoyed on its own or used in various recipes.
Ingredients
To make kefir cheese, you’ll need:
- Kefir grains or kefir starter culture
- Fresh milk (cow’s milk, goat’s milk, or non-dairy milk)
- A glass jar or container
- Cheesecloth or a coffee filter
- A strainer or colander
- Optional: salt, herbs, or spices for flavoring
Step-by-Step Instructions
Step 1:
Prepare the Kefir Base Start by adding the kefir grains or kefir starter culture to a glass jar or container. The amount of kefir grains or starter culture needed will depend on the manufacturer’s instructions. Next, pour fresh milk into the jar, leaving some room for the kefir to ferment. If you’re using non-dairy milk, make sure it doesn’t contain additives that may interfere with fermentation.
Step 2:
Ferment the Kefir Cover the jar with a lid or a cloth secured with a rubber band to keep out contaminants while allowing air circulation. Place the jar in a warm spot, ideally between 68-85°F (20-30°C), for about 24-48 hours. The longer you ferment, the tangier the kefir will become. Keep an eye on it and taste it occasionally to determine your desired level of tanginess.
Step 3:
Strain the Kefir Once the kefir has fermented to your liking, it’s time to strain it to make cheese. Set a strainer or colander over a bowl or another container. Line the strainer with a double layer of cheesecloth or a coffee filter. Pour the kefir into the lined strainer, allowing the whey to drain through while the curds are retained.
Step 4:
Let It Strain and Thicken Gather the corners of the cheesecloth or filter and tie them together with a string. Hang the bundle over a bowl or sink to let the remaining whey drip out. This process can take anywhere from 12 to 24 hours, depending on the desired consistency. The longer you strain, the thicker the cheese will become.
Step 5:

Flavor and Store Once the kefir cheese has reached your desired consistency, you can flavor it with a pinch of salt, herbs, or spices if desired. Mix well to incorporate the flavors. Transfer the cheese to a clean jar or airtight container and refrigerate it. Kefir cheese can be stored in the refrigerator for up to one week, but it’s so delicious that it likely won’t last that long!
Tips and Variations :
- Experiment with different types of milk, such as cow’s milk, goat’s milk, or even non-dairy milk like coconut or almond milk, to create unique flavors.
- For a creamier texture, you can add a small amount of heavy cream or strained kefir whey to the cheese.
- Get creative with flavorings! Try adding chopped fresh herbs like dill or chives, spices like garlic or paprika, or even dried fruits and nuts.
- Don’t discard the leftover whey! It’s packed with nutrients and can be used in smoothies, baked goods, or as a liquid in cooking.
Incorporating Kefir Cheese into Your Meals
Now that you’ve successfully made your own kefir cheese, it’s time to enjoy it in various ways. Spread it on toast or bagels, use it as a dip for vegetables or crackers, or incorporate it into pasta dishes and salads. Kefir cheese also adds a delightful creaminess to soups and sauces. Its tangy flavor pairs well with both sweet and savory ingredients, making it a versatile ingredient in your kitchen.
Conclusion
Making kefir cheese at home is a rewarding and delicious endeavor. With just a few simple steps, you can create a creamy, tangy cheese packed with probiotics and health benefits. So, grab your kefir grains, some fresh milk, and embark on a culinary adventure with homemade kefir cheese. Your taste buds will thank you!